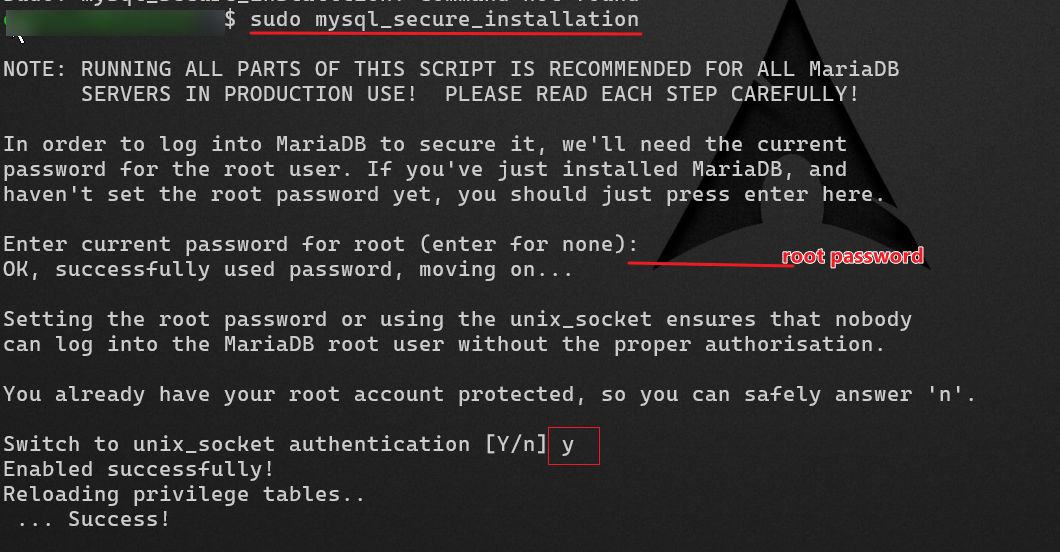
ERPNext 在 Ubuntu 24.04 LTS 中的安装笔记 Step by Step 文章目录 | Table of Contents ERPnext 简介 先决条件 安装步骤 总结 & 引用 先决条件 | Prerequisites 系统环境要求 Ubuntu 24.04 A user with sudo privileges Python 3.11+ pip 20+ MariaDB 10.3.x Node.js 18 Yarn 1.12+ 硬件要求 2 Process 2 Core 4GB ram 40GB Storage Intenet 安装步骤 | Installtion Steps 包升级和创建新用户 Update and Upgrade Packages sudo apt-get update -y && sudo apt-get upgrade -y Create a New user sudo adduser **Your-user-name** #Fill in the information as prompted sudo usemod -aG sudo **Your-user-name** su **Your-user-name** #Enter your password cd ~ 安装环境需要的包 sudo bench setup production **erp-user** 将 ERPNext 配置为生产模式。 该命令会: 配置 Gunicorn(用于处理 Python 请求的 WSGI 服务器)。 配置 Supervisor(用于管理后台进程)。 确保站点在生产环境中以最佳性能运行。 [**erp-user**] 是运行 Frappe/ERPNext 的系统用户(通常为 frappe)。 bench setup nginx 配置 Nginx 作为反向代理服务器。 Nginx 负责处理外部请求并将其转发给 Gunicorn。 该命令会自动生成 Nginx 配置文件并启用站点。 sudo supervisorctl restart all 重启所有由 Supervisor 管理的进程。 确保所有服务(如 Gunicorn、后台工作进程等)使用最新的配置。 sudo bench setup production **erp-user**(重复) 再次运行以确保所有生产配置已正确应用。 访问站点 在生产模式下,ERPNext 通过 Nginx 提供服务,默认使用 HTTP(80 端口)或 HTTPS(443 端口)。 你可以直接通过服务器的 IP 地址或域名访问站点,无需指定端口号(如 http://your-server-ip)。 总结 和 引用 | Conclusion & References References: How to Install ERPNext Version 15 on Ubuntu 24.04: A Step-by-Step Guide - https://syncbricks.com/how-to-install-erpnext-version-15-on-ubuntu-24-04-a-step-by-step-guide/ Youtube - Chat GPT & DeepSeek

In this article, I will share with you about my second time installing CUPS on Ubuntu. Requriement Ubuntu 18.04 LTS Install on an Old Computer Canon E410 Series Printer Internet CUPS Installation and Configuration Step by Step Install CUPS on your system #install cups sudo apt-get install cups cups-pdf cups-bsd Back up the configuration file #copy configuration file sudo cp /etc/cups/cupsd.conf cupsd.conf.bak Editing the CUPS configuration file #add user simith to lpadmin group sudo usermod -aG lpadmin simith #edit cupsd.conf sudo vim cupsd.conf Edited cupsd.conf contents.(Configuration options not mentioned should be left as default.) #allow access port Port 63100 LogLevel warn PageLogFormat MaxLogSize 200 1. Show shared printers on the local network. Browsing on BrowseLocalProtocols dnssd 1. Web interface setting... WebInterface Yes 1. Restrict access to the server... <Location /> Order Allow,deny Allow @LOCAL Allow From 127.0.0.1 Allow From 192.168.0.0/16 </Location> 1. Restrict access to the admin pages... <Location /admin> #access user simith can visit admin page Require user simith Order Allow,deny Allow @LOCAL Allow 127.0.0.1 Allow From 192.168.0.0/16 </Location> 1. Restrict access to configuration files... <Location /admin/conf> AuthType Default Require user simith Order allow,deny Allow @LOCAL Allow 127.0.0.1 Allow From 192.168.0.0/16 </Location> 1. Restrict access to log files... <Location /admin/log> AuthType Default Require user simith Order allow,deny Allow @LOCAL Allow 192.168.0.0/16 </Location> Restart CUPS service and add to starup sudo systemctl restart cups sudp systemctl enable cups End Finally, you can visit the Ubuntu IP address and configuration Example: " http:// ubuntu ip address:63100 " Another article 打印服务器cups安装笔记https://www.itiohub.com/log/413.html
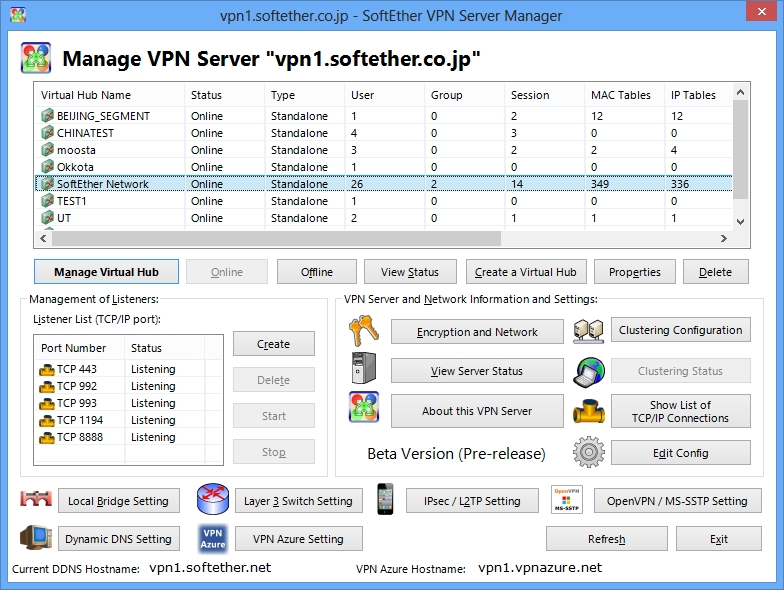
SoftEther 是一个由日本筑波大学开发的开源VPN 项目,你可以自由的使用它为你的家庭或者公司组建虚拟局域网。它拥有多平台服务端和客户端,方便简易的操作界面,得到了很多人的喜爱。接下来就跟着我的操作一起来学习一下吧。 SoftEther 简介 https://www.softether.org/9-about SoftEher下载 https://www.softether.org/5-download 服务端环境 Ubuntu 16.4.1 & Centos 7.6 操作步骤 通过SSH 客户端连接到Linux服务器,更新下载gcc工具 sudo apt-get update sudo apt-get install build-essential 将SoftEther服务端下载到Linux服务器(需要科学上网环境,根据你的系统版本下载相对应版本) wget https://www.softether-download.com/files/softether/v4.34-9745-rtm-2020.04.05-tree/Linux/SoftEther_VPN_Server/64bit_-_Intel_x64_or_AMD64/softether-vpnserver-v4.34-9745-rtm-2020.04.05-linux-x64-64bit.tar.gz 解压SoftEther服务端 tar -zxvf softether-vpnserver-v4.34-9745-rtm-2020.04.05-linux-x64-64bit.tar.gz 进入VPNserver 目录 进行make(make后会有3个问题询问。一直同意按1回车即可) cd vpnserver make 在vpnserver目录启动VPNServer ./vpnserver start #启动服务 ./vpnserver stop #停止服务 启动服务之后可以直接通过Softher管理工具进行连接管理和初始化配置了。 这里就不一一介绍了。此笔记只记录服务端配置。 ubuntu 设置开机启动(编辑rc.local 目录把vpnserver 启动添加进去即可) vi /etc/rc.local /home/ubuntu/vpnserver/vpnserver start #exit 0 之前写入 Centos 7.6设置开机启动请参阅此文章https://www.itiohub.com/log/centos6run.html 这样一来服务端就配置完成。 接下来就可以根据自己需求来通过SoftEther 管理工具进行配置和管理了。 参考文章: https://dmesg.app/softether-vpnserver.html https://www.softether.org/